Exadata Healthcheck – Top 5 Tools and Features!

Hi all,
It’s not new for Oracle DBAs the countless great tools we have out of the box to help us out with our daily tasks, such as ORAchk/EXAchk/ODAchk, Database Security Assessment Tool (DBSAT), Hang Manager, Cluster Health Advisor (CHA), Cluster Verification Utility (CVU), Memory Guard, Tracefile Analyzer (TFA) with tools like oratop, procwatcher, oswatcher, pstack, RDA, and the list goes on and on…

The good news is, most of the tools are now together on the Autonomous Health Framework (AHF), since version 12.2. None of those tools are running by default though, so you might need to choose some to start and enable on your environment.

But out of all this list, what if we could choose the top 5 features we can and should use as a start for Exadata Environment? Well, I did mine, see it below.

Oh, and by the way, you don’t pay anything else for them, counting you already have Oracle Support Services!

1. Cluster Health Advisor – Calibrate your Exa Environment!

Available along with the AFH since 12.2, the CHA works along the Cluster Health Monitor to provide you fine-grained notifications and correlations about your environment. And when I say it, I mean it: YOUR environment. This is because the CHA works better if you calibrate it with your statistics. As usual, not the worse problematic day or the low workload night, but an average day which can be used as a reference. All this is stored in the GIMR (as shown below) and used for future comparison and model inference.

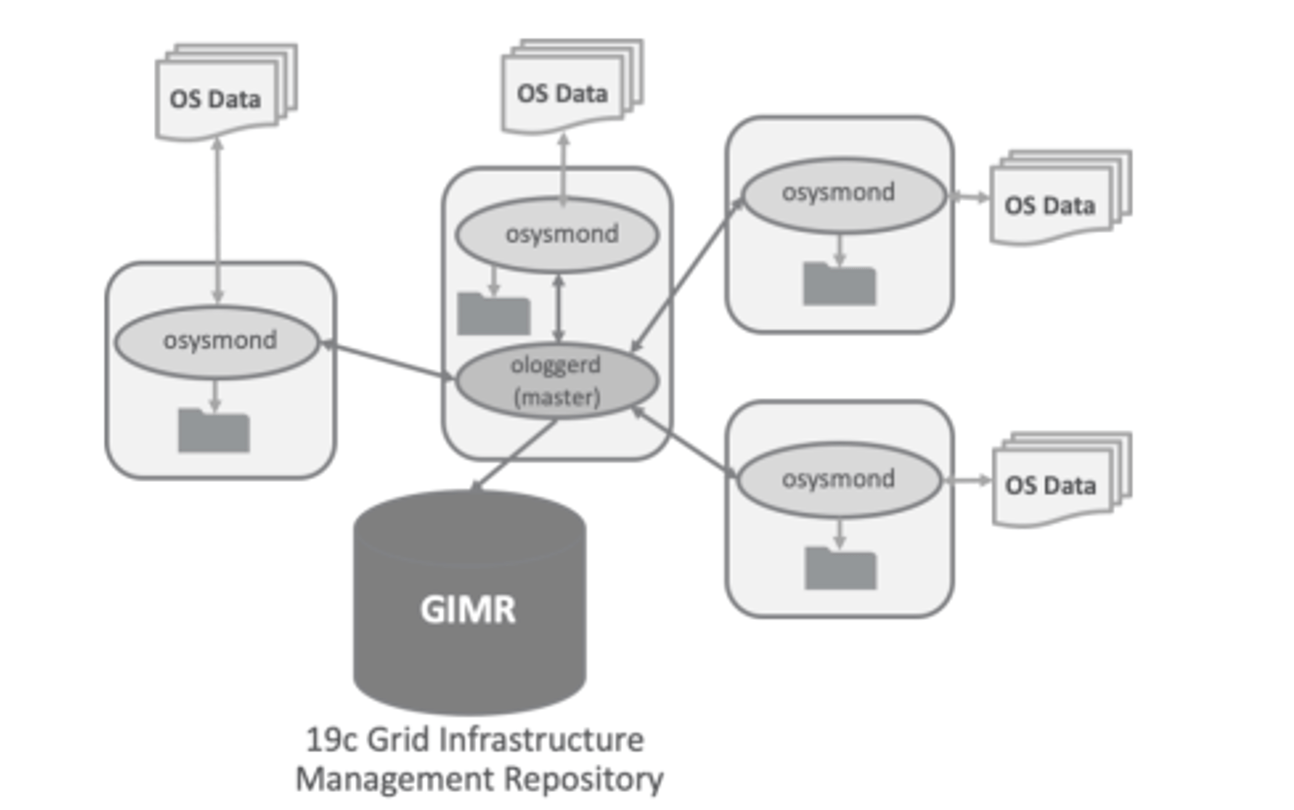
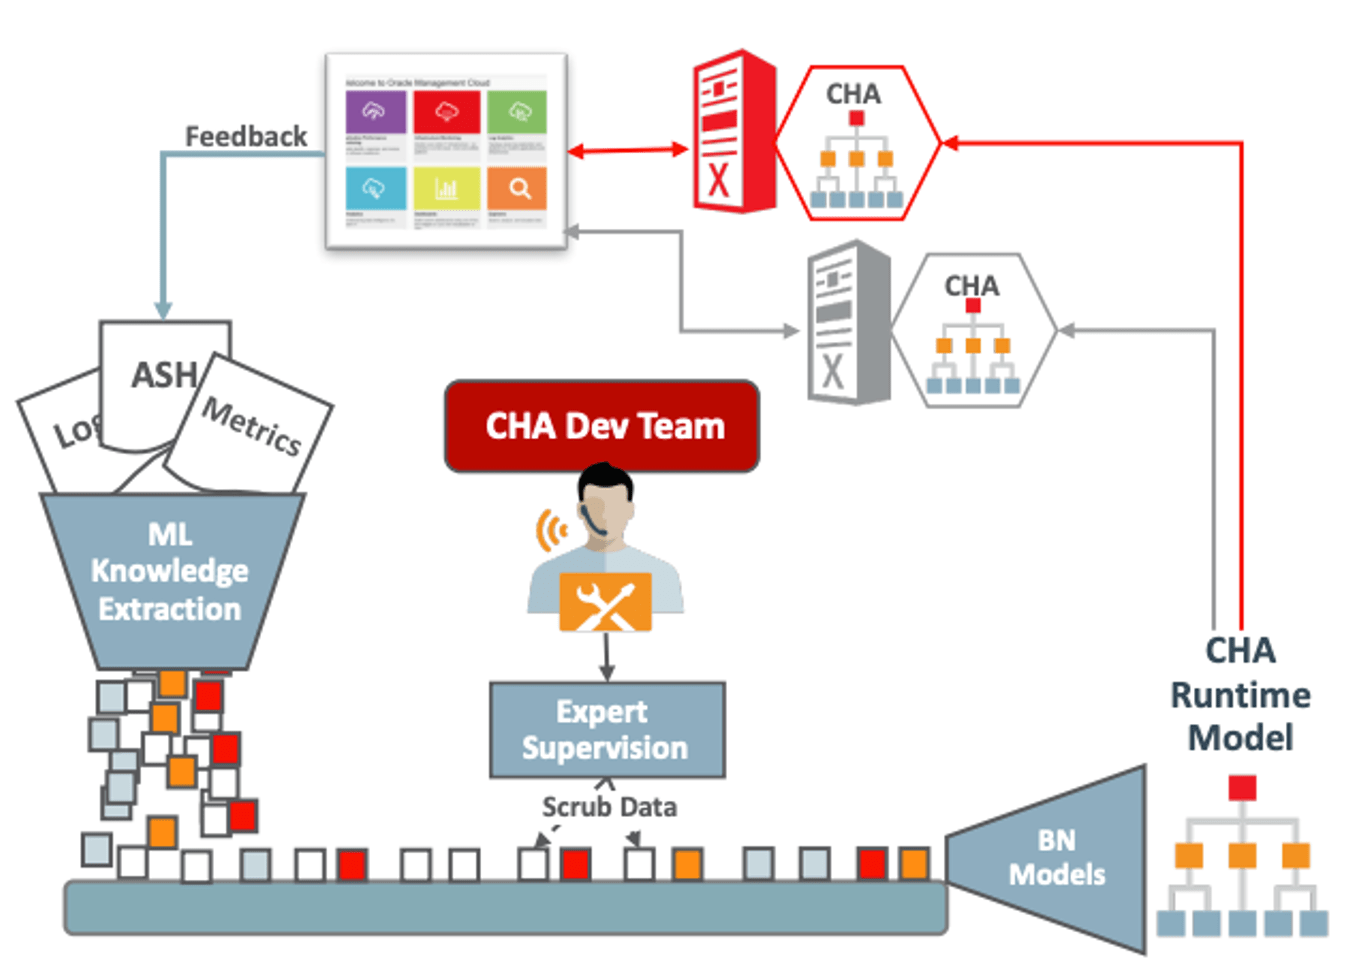
This means the CHA is not a long list of IFs with fixed metrics, but an intelligent tool monitoring over 127 processes that perform work based on your workload. Not only this, the CHA is enriched with Machine Learning algorithms that model over 30 known DB problems based on over 150 metric predictors.


An example of inference can be seen below, where network and Global Cache statistics are used to inference a network issue.

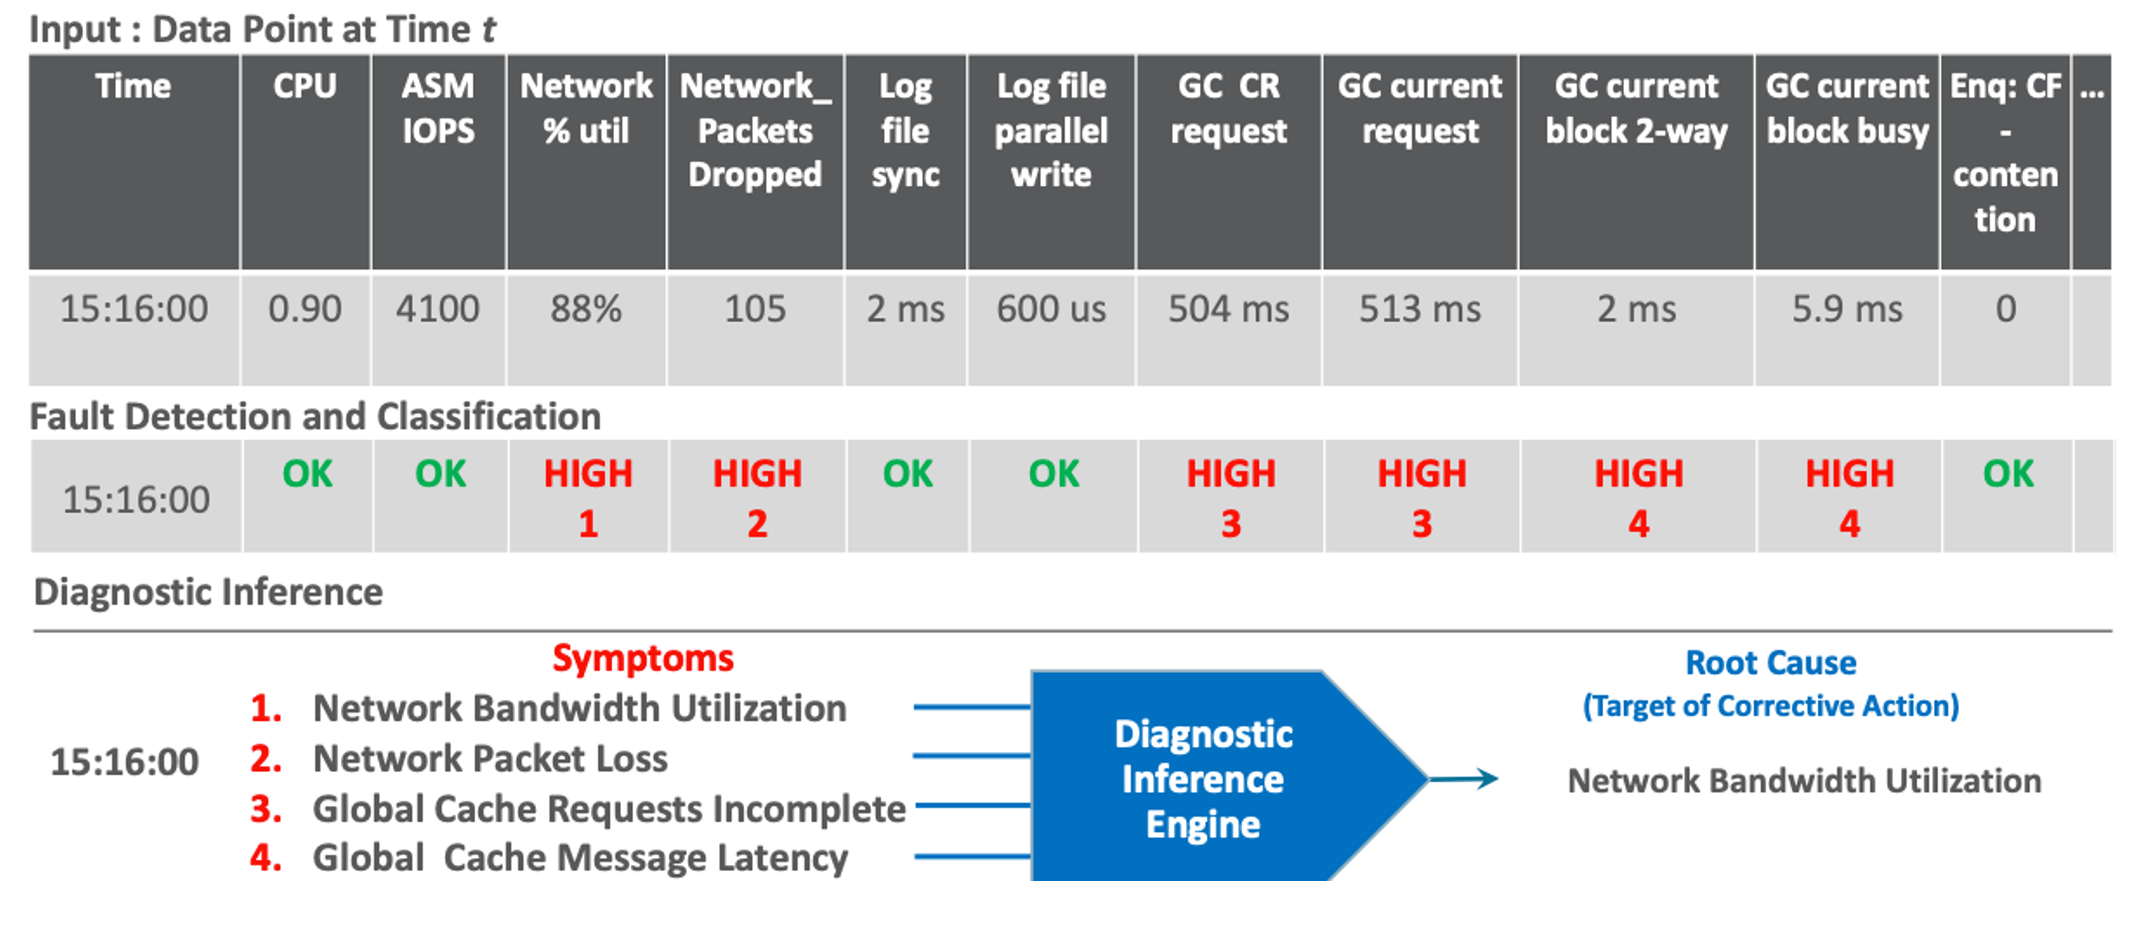
Not rocket science, but always nice to have someone digesting tons of logs and metrics and reaching this sort of conclusion unassisted, right? You as DBA can steal all credits for the finding, no hard feelings.

And this is just one of the things CHA provides. It has tons of other functionalities. You should try using it more!


2. EXAchk – Daily Automated Runs (and Reports)

Most likely if you have an Exadata, you are used to running from time to time an EXAchk to review the recommendations and best practices for your environment. It’s something that requires almost no effort to run and to copy the reports, or you most likely have created an script to do so. What if I tell you Oracle has now automated this with AHF?

All you need to do is to confirm the scheduled runs and set the address for the reports to be sent. Find below a quick Cheatsheet:

a. Checking Status of the EXAchk

[root@exa01dbadm01 ~]# exachk -d info
------------------------------------------------------------

Master node = exa01dbadm01

exachk daemon version = 211300

Install location = /opt/oracle.ahf/exachk

Started at = Wed Jun 16 11:58:03 MDT 2021

Scheduler type = TFA Scheduler


[root@exa01dbadm01 ~]# exachk -d status
exachk is using TFA Scheduler. TFA PID: 369350

b. Checking Status of TFA Daemon Status and Auto Start

[root@exa01dbadm01 ~]# ahfctl statusahf

.-----------------------------------------------------------------------------------------------------.
| Host | Status of TFA | PID | Port | Version | Build ID | Inventory Status |
+--------------+---------------+--------+------+------------+----------------------+------------------+
| exa01dbadm01 | RUNNING | 369350 | 5000 | 21.1.3.0.0 | 21130020210607124914 | COMPLETE |
| exa01dbadm02 | RUNNING | 118950 | 5000 | 21.1.3.0.0 | 21130020210607124914 | COMPLETE |
'--------------+---------------+--------+------+------------+----------------------+------------------'

------------------------------------------------------------

Master node = exa01dbadm01

exachk daemon version = 211300

Install location = /opt/oracle.ahf/exachk

Started at = Wed Jun 16 11:58:03 MDT 2021

Scheduler type = TFA Scheduler

------------------------------------------------------------
ID: exachk.autostart_client_exatier1
------------------------------------------------------------
AUTORUN_FLAGS = -usediscovery -profile exatier1 -syslog -dball -showpass -tag autostart_client_exatier1 -readenvconfig
COLLECTION_RETENTION = 7
AUTORUN_SCHEDULE = 3 2 * * 1,2,3,4,5,6
------------------------------------------------------------
------------------------------------------------------------
ID: exachk.autostart_client
------------------------------------------------------------
AUTORUN_FLAGS = -usediscovery -syslog -tag autostart_client -readenvconfig
COLLECTION_RETENTION = 14
AUTORUN_SCHEDULE = 3 3 * * 0
------------------------------------------------------------

Next auto run starts on Jun 17, 2021 02:03:00

ID:exachk.AUTOSTART_CLIENT_EXATIER1

c. Gather EXAchk Next Automated Run

[root@exa01dbadm01 ~]# exachk -d nextautorun

Next auto run starts on Jun 17, 2021 02:03:00

ID:exachk.AUTOSTART_CLIENT_EXATIER1

[root@exa01dbadm01 ~]#

d. Changing EXAchk Notifications:

[root@exa01dbadm01 ~]# exachk -get NOTIFICATION_EMAIL,AUTORUN_SCHEDULE,COLLECTION_RETENTION
------------------------------------------------------------
ID: exachk.autostart_client_exatier1
------------------------------------------------------------
COLLECTION_RETENTION = 7
AUTORUN_SCHEDULE = 3 2 * * 1,2,3,4,5,6
------------------------------------------------------------
------------------------------------------------------------
ID: exachk.autostart_client
------------------------------------------------------------
COLLECTION_RETENTION = 14
AUTORUN_SCHEDULE = 3 3 * * 0
------------------------------------------------------------


[root@exa01dbadm01 ~]# exachk -id autostart_client -set NOTIFICATION_EMAIL=boesing@pythian.com

Updated attribute ['NOTIFICATION_EMAIL=boesing@pythian.com'] for Id[exachk.AUTOSTART_CLIENT]

Successfully copied Daemon Store to Remote Nodes


[root@exa01dbadm01 ~]# exachk -get NOTIFICATION_EMAIL,AUTORUN_SCHEDULE,COLLECTION_RETENTION
------------------------------------------------------------
ID: exachk.autostart_client_exatier1
------------------------------------------------------------
COLLECTION_RETENTION = 7
AUTORUN_SCHEDULE = 3 2 * * 1,2,3,4,5,6
------------------------------------------------------------
------------------------------------------------------------
ID: exachk.autostart_client
------------------------------------------------------------
NOTIFICATION_EMAIL = boesing@pythian.com
COLLECTION_RETENTION = 14
AUTORUN_SCHEDULE = 3 3 * * 0
------------------------------------------------------------

[root@exa01dbadm01 ~]# exachk -id autostart_client_exatier1 -set NOTIFICATION_EMAIL=boesing@pythian.com
Updated attribute ['NOTIFICATION_EMAIL=boesing@pythian.com'] for Id[exachk.AUTOSTART_CLIENT_EXATIER1]

Successfully copied Daemon Store to Remote Nodes


[root@exa01dbadm01 ~]# exachk -get NOTIFICATION_EMAIL,AUTORUN_SCHEDULE,COLLECTION_RETENTION
------------------------------------------------------------
ID: exachk.autostart_client_exatier1
------------------------------------------------------------
NOTIFICATION_EMAIL = boesing@pythian.com
COLLECTION_RETENTION = 7
AUTORUN_SCHEDULE = 3 2 * * 1,2,3,4,5,6
------------------------------------------------------------
------------------------------------------------------------
ID: exachk.autostart_client
------------------------------------------------------------
NOTIFICATION_EMAIL = boesing@pythian.com
COLLECTION_RETENTION = 14
AUTORUN_SCHEDULE = 3 3 * * 0
------------------------------------------------------------

e. Change EXAchk Schedule and Retention

[root@exa01dbadm01 ~]# exachk -id autostart_client_exaier1 –set "AUTORUN_SCHEDULE=0 3 * * *" -> Time= 3 AM daily
[root@exa01dbadm01 ~]# exachk-id autostart_client –set "collection_retention=90"

f. EXAchk: Testing Email Sending and Running EXAchk Report over email

This is for ad-hoc testing to check about email sending, out of the scheduled runs.

[root@exa01dbadm01 ~]# exachk -testemail notification_email=boesing@pythian.com
Email Successfully sent to ['boesing@pythian.com'] from 'root@exa01dbadm01
[root@exa01dbadm01 ~]# exachk -sendemail notification_email=boesing@pythian.com


Searching for running databases . . . . .

. . . . . . . . . . . .
List of running databases registered in OCR

1. xxxxxx
2. yyyy
3. None of above

Select databases from list for checking best practices. For multiple databases, select 3 for All or comma separated number like 1,2 etc [1-3][3].
[...]
Detailed report (html) - /u01/app/oracle/oracle.ahf/data/exa01dbadm01/exachk/user_root/output/exachk_exa01dbadm01_xxxxx_061621_134748/exachk_exa01dbadm01_xxxxx_061621_134748.html

UPLOAD [if required] - /u01/app/oracle/oracle.ahf/data/exa01dbadm01/exachk/user_root/output/exachk_exa01dbadm01_xxxxxx_061621_134748.zip
Email Successfully sent to ('boesing@pythian.com',) from 'root@exa01dbadm01' with attachment

3. TFA – Sanitize and Mask Options

Even with all the concerns on sensitive data being more and more relevant, this is something that actually surprised me. It’s possible to Sanitize and Mask data in collections. For example, mask will hide your inner data (let’s say table names):

[root@exa01dbadm01 ~]# tfactl diagcollect -srdc ORA-00600 -mask

Sanitize will hide your hardware setting. Not that useful if you have an Exadata, but might be interesting if you have commodity hardware you don’t want Oracle to know about.

[root@exa01dbadm01 ~]# tfactl diagcollect -srdc ORA-00600 -sanitize

4. TFA Changes – “Nothing was Changed” Resolver Tool

This is for all the DBAs which had already this dialogue:

Client: Yesterday was running fine, and today it’s veeeery slow. Nothing was changed!
DBA: Something changed, that’s for sure.
Client: Absolutely nothing changed.

So now we can access if indeed nothing changed from the client’s perspective (perhaps an automatic statistics gathering or something) or if anybody did something and is hard to identify.

It takes parameters from OS and DB and tracks of old and new values, reporting changes:

[root@exa01dbadm01 ~]# tfactl changes

Output from host : exa01dbadm02
------------------------------
No Changes Found

Output from host : exa01dbadm01
------------------------------
[Nov/14/2021 00:08:33.000]: [db.dbprod19.dbprod191]: Parameter: log_archive_dest_2: Value: service=dbprod19stb => ASYNC NOAFFIRM delay=240 optional compression=disable max_failure=0 reopen=300 db_unique_name=dbprod19stb net_timeout=300
[Nov/14/2021 00:08:33.000]: [db.dbprod19.dbprod191]: Parameter: log_archive_dest_2: Value: service=dbprod19stb => valid_for=(online_logfile,all_roles)

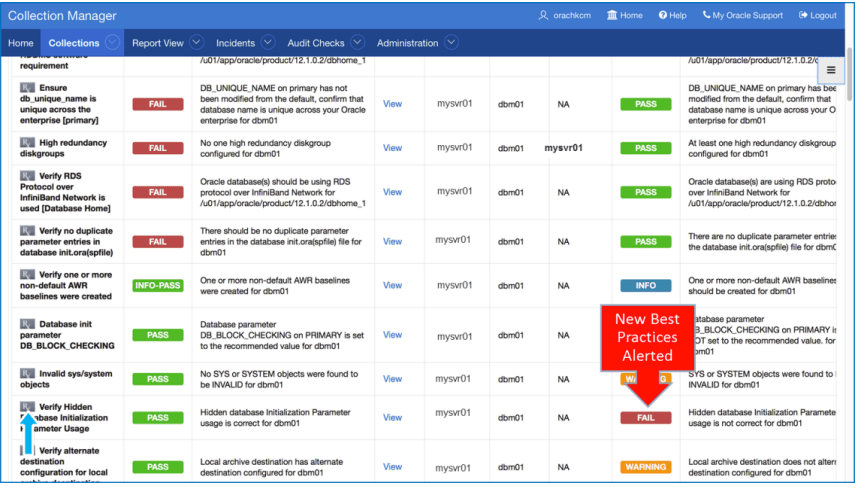
5. Oracle Health Check Collections Manager

Not a surprise if you don’t know this tool, but I’d really recommend you do look for it now. It’s a great tool and as with everything in this post, it’s free!

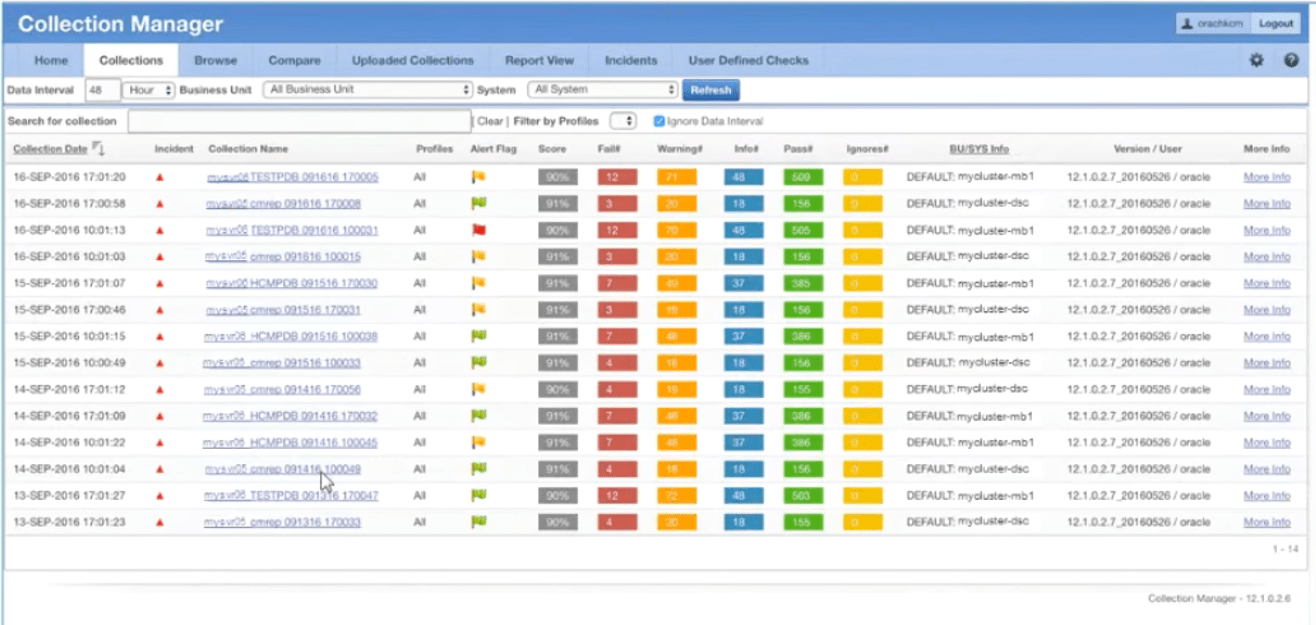
Oracle Health Check Collections Manager is an APEX companion application to Oracle EXAchk that gives you an enterprise-wide view of your health check collection data. All you need to have is an APEX 4.2 or 5 version and deploy the tool. The main idea is that you can consolidate all your reports in one place and, as a plus, you can manage all your EXAchk reports across the time, including a view on the items regression you may have.

This is an example of the view of the collections:

And this is an example of a new best practices failure:

Do you agree with my top list? Let me know your thoughts!

Exadata DNS Change – Pitfalls to be avoided

Hi all, it’s been a while but here I am!

There were some changes in the infrastructure at the place I work and I was asked to do a DNS change on a bit old Exadata X5. I had never done one before this, so the idea of this post is to help others who might face the issues I had.

The first thing I did was to look up the documentation about it and see the steps, yes there are blogs about it but the doc can help to get at least the first glance of the situation.

Long story short: Exadata has lots of components and the new DNS should be changed on all of them.

Here is a summary of the steps.

Infiniband switches

Connect to the switches and sudo to ilom-admin and change the DNS

su - ilom-admin
show /SP/clients/dns
set /SP/clients/dns nameserver=192.168.16.1,192.168.16.2,192.168.16.3
show /SP/clients/dns


Database nodes

For my image I only needed to change the /etc/resolv.conf, if you have a newer one you will need to user ipconf – That´s why you need to go to the documentation, at least there we hope that they will put some mentions on the pitfalls (well keep reading and you will see that was not my case)

Also changed the DNS on wach database node ilom, runing the ipmtool from the each node

ipmitool sunoem cli 'show /SP/clients/dns'
ipmitool sunoem cli 'set /SP/clients/dns nameserver=192.168.16.1,192.168.16.2,192.168.16.3'
ipmitool sunoem cli 'show /SP/clients/dns'


Cell nodes – Here things start to get interesting

For the storage cell there are some points that need to be taken under consideration:

Increase the ASM disk_repair_time – the goal here is to avoid a full rebalance if you do this within its timeframe, if you don’t know this parameter,  ASM will wait for up to the interval specified for DISK_REPAIR_TIME for the disk(s) to come online. If the disk(s) come back online within this interval, a resync operation will occur, where only the extents that were modified while the disks were offline are written to the disks once back online. If the disk(s) do not come back within this interval, ASM will initiate a forced drop of the disk(s), which will trigger a rebalance.

On each cell node we need to make sure all disks are OK, stop all cell disks, stop all cell services and user ipconfig to change the DNS configuration

#Check that putting the grid disks offline will not cause a problem for Oracle ASM - it should all say YES on the 3rd column 
cellcli -e LIST GRIDDISK ATTRIBUTES name,asmmodestatus,asmdeactivationoutcome

#Inactivate all grid disks on the cell - may take a while to complete
cellcli -e ALTER GRIDDISK ALL INACTIVE


#Confirm the grid disks are offline, it should show asmmodestatus=OFFLINE or asmmodestatus=UNUSED, and asmdeactivationoutcome=Yes for all grid disks
cellcli -e LIST GRIDDISK ATTRIBUTES name, asmmodestatus,asmdeactivationoutcome

#Confirm that the disks are offline
cellcli -e LIST GRIDDISK

#Shut down the cell services and ocrvottargetd service
cellcli -e ALTER CELL SHUTDOWN SERVICES ALL
service ocrvottargetd stop #on some images this services does not exists

To execute the ipconf on the old way we only need to call it can follow the prompts, but if you have a newer image you will need to provide its parameters as is shown in the documentation.

The documentation says that after it we could start the cell services back up but I would recommend validating the DNS prior to doing that, why is that you might say because mine did not work and I could have a bigger issue with a cell node without DNS trying to start the services.

So, how to test, use nslookup, dig and curl

nslookup dns_domain.com
curl -v 192.168.16.1:53
dig another_server_in_the_network


My tests did not work, I was able to ping the DNS servers but not to resolve any name, I had an SR on MOS but did not help much either, looking up as this is a production system I tried to see if the firewall was up on the Linux site, and to my surprise it was.

I tried to manually add rules to iptables but it did not work and then I came across this note Exadata: New DNS server is not accessible after changing using IPCONF (Doc ID 1581417.1)

And there it was, I needed to restart the cellwall service to recreate the iptables rules.

# Restart cellwall service
service cellwall restart
service cellwall status

One final point, check if ASM started the rebalance or not, if it did, do not start to bring down another cell node until the rebalance is finish, otherwise you may run into deeper issues.


I hope it helps!

Elisson Almeida

ORA-07445 [kxsPurgeCursor()]

Hi all,
We started getting lots of ORA-07445 errors that are being reported in the Exadata production database from a client.
Checking on the traces we can see that someone is running the below SQL and that is triggering these errors:
declare
i number := 0;
begin
for c1 in (
select address, hash_value, sql_id from v$sql where
last_active_time < sysdate - 1/24
and executions < 2 ) loop
begin
dbms_shared_pool.purge(c1.address || ' ' || to_char(c1.hash_value), 'C');
i := i + 1;
exception when others then
dbms_output.put_line(c1.sql_id);
end;
end loop;
dbms_output.put_line('Cursors purged = ' || to_char(i));
end;
/
I’m not even going to discuss the PL above, it’s purging all new SQLs executed less than 2 times in the last 24hours. I’m not really agreeing with this…
What matters is: in the end, it was being caused because hash value of non-cursor is being passed to dbms_shared_pool.purge().  This is a match to Bug 29281112 – ORA-7445: [kxspurgecursor()+517] [sigsegv] (Doc ID 29281112.8)
There is no actual workaround besides stop passing a non-cursor hash to dbms_shared_pool.purge, however we have a fix for a better addressing of those cases on:

Quick Reference: Oracle Exadata default passwords

It’s not needed to say how important this is to have all the password reset, even though on new Exa hardware the SSH is usually disabled. How ever, oftenly we need to have access in some of the consoles knowing the password was never changed but unaware on what it should be.

For those cases (until you change it, ASAP), here is a quick reference:

Database Server:

  • root/welcome1
  • oracle/welcome1
  • grid/welcome1
  • grub/sos1Exadata

Exadata Storage Servers:

  • root/welcome1
  • celladmin/welcome1
  • cellmonitor/welcome1

InfiniBand switches:

  • root/welcome1
  • nm2user/changeme

Ethernet switches:

  • admin/welcome1

Power distribution units (PDUs):

  • admin/welcome1
  • root/welcome1

Database server ILOMs:

  • root/welcome1

Exadata Storage Server ILOMs:

  • root/welcome1

InfiniBand ILOMs:

  • ilom-admin/ilom-admin
  • ilom-operator/ilom-operator

Keyboard, video, mouse (KVM):

  • admin/welcome1

Change them!

I hope this was useful for you.

ODA Useful Commands to Manage VMs

1. To restart the vm:

oakcli stop vm [vm-name]
oakcli stop vm [vm-name] -force
oakcli start vm [vm-name]

2. To show All vm status

oakcli show vm

Example:

root@server oak]# oakcli show vm

NAME NODENUM MEMORY VCPU STATE REPOSITORY
vm1 1 8192 4 ONLINE fileshare

3. Listing Configured Options for a VM Template

oakcli show vmtemplate ol6linux_64

4. Adding a Network to the VM Template

oakcli modify vmtemplate ol6linux_64 -addnetwork net1

5. Configure CPU, Memory on the Template

oakcli configure vmtemplate ol6linux_64 -vcpu 4 -maxvcpu 8 -cpucap 10 -memory 3000M -maxmemory 6G -os OTHER_LINUX

6. Create a VM by Cloning from Template

oakcli clone vm ol6test -vmtemplate ol6linux_64 -repo repo1 -node oda2

7. Override VM Template Values

oakcli configure vm ol6test -vcpu 6 -memory 4G

8. Configure High Availability and Failover Values

oakcli configure vm ol6test -prefnode oda2 -failover oda1

9. Start a VM

oakcli start vm ol6test

10. Access VM Console for a VM:

oakcli show vmconsole [vm-name]

Hope it helps you!

General ILOM Faults Management

Hi all,
So just a quick reference: Some useful general commands for ILOM:

1. Check for Faults:

/home/boesing> ssh root@[ilom ip]    

Oracle(R) Integrated Lights Out Manager

Version 3.1.2.10 r74387

Copyright (c) 2014, Oracle and/or its affiliates. All rights reserved.

-> cd /SP/faultmgmt
/SP/faultmgmt

-> start shell
Are you sure you want to start /SP/faultmgmt/shell (y/n)? y

faultmgmtsp> 
faultmgmtsp> fmadm 
Usage: fmadm 
  where  is one of the following:
    faulty [-asv] [-u ]   : display list of faulty resources
    faulty -f                   : display faulty on FRUs
    acquit                 : acquit faults on a FRU
    acquit                : acquit faults associated with UUID
    acquit           : acquit faults specified by
                                  (FRU, UUID) combination
    replaced               : replaced faults on a FRU
    repaired               : repaired faults on a FRU
    repair                 : repair faults on a FRU
    rotate errlog               : rotate error log
    rotate fltlog               : rotate fault log

faultmgmtsp> 
faultmgmtsp> fmadm faulty
No faults found

– Another way to see current issues:

show /SP/logs/event/list show faulty

2. Clearing Faults:
In case there is a failure that can be ignored (for example, lost of AC power), it may be cleared:

set /SYS/PSU1 clear_fault_action=true

3. Checking Additional Logs:

start /SYS 
->y 
ls /SYS 
start /SP/console 
-> y
show /SP/logs/event/list 

Some MOS notes for reference:

– Diagnostic information for ILOM, ILO , LO100 issues (Doc ID 1062544.1)
– How to run an ILOM Snapshot on a Sun/Oracle X86 System (Doc ID 1448069.1)
– PSH Procedural Article for ILOM-Based Diagnosis (Doc ID 1155200.1)

Clear Exadata Component Messages After Maintenance

Hi all,

Quick one today: So you completed a maintenance in a component (a memory component, as per example below) but keep receiving messages of failure?

Well, try clearing all the error messages after complete the maintenance and lets check if the threshold is reached again. If so, we may need to really replace it.

How to do it? Easy:

ssh root@grepora01-ilom
-> show /SYS/MB/P0/D3
Expected:
[...]
fault_state = Faulted
[..]
-> set /SYS/MB/P0/D3 clear_fault_action=true
Are you sure you want to clear /SYS/MB/P0/D3 (y/n)? y
-> show /SYS/MB/P0/D3
[Expected]
 /SYS/MB/P0/D3
    Targets:
        PRSNT
        SERVICE
Properties:
type = DIMM
ipmi_name = MB/P0/D3
fru_name = 16384MB DDR4 SDRAM DIMM
fru_manufacturer = Samsung
fru_part_number = %
fru_rev_level = 01
fru_serial_number = %
 fault_state = OK
clear_fault_action = (none)

Workshop: Best Practices for Oracle DB on Exadata: RUN, It’s Free!

Hey, you in Porto Alegre/Brazil!

Don’t miss this opportunity to have an official Oracle Workshop about Exadata Best Practices for Oracle Database!

This is being being promoted by GUORS in partnership with Oracle Brasil.

Draft - Convite (1)

When? June 26th from 2PM to 6PM BRT.
Where?  TecnoPUC-RS, room 206 – building 99A
Instructor: Valter Rodrigues da Oracle Brasil.

LIMITED POSITIONS: 30!


Requirements
:

1. Like GUORS Page on Facebook AND LinkedIn
2. Like Oracle University on LinkedIn
3. Like GUOB on LinkedIn
4. Bring your notebook.
5. Basic knowledge on RAC

Subscribe ASAP!

Exadata: Generate a Sundiag

Hello all!

Today’s post is a very simple one, once seems sometimes a simple and success case post is appreciated. So, how to generate a Sundiag Report for Oracle?

First, what is a Sundiag?
It consists in an Oracle hardware healthcheck list to be run on your environment. It doesn’t give us any report, but is usually requested by Oracle on SRs related to network, disk I/O or any other possible hardware/firmware related issue.

So, how to do it? Simple like this (the path is always the same):

[root@greporacel01 ~]# cd /opt/oracle.SupportTools/
[root@greporacel01 oracle.SupportTools]# /opt/oracle.SupportTools/sundiag.sh

Oracle Exadata Database Machine - Diagnostics Collection Tool

Gathering Linux information

Skipping ILOM collection. Use the ilom or snapshot options, or login to ILOM
over the network and run Snapshot separately if necessary.

/tmp/sundiag_greporacel01_1108FMM0FF_2017_01_01_02_17
Gathering Cell information

Generating diagnostics tarball and removing temp directory

====================================================================
Done. The report files are bzip2 compressed in /tmp/sundiag_greporacel01_1108FMM0FF_2017_01_01_02_17.tar.bz2
====================================================================
[root@greporacel01 oracle.SupportTools]#

Now you just need to pick this generated file and add to your SR. Simple right?

Hope it helps!